Saturday 28 December 2013

Cara merubah warna block di blog

Cara merubah warna block di blog. Block disini maksudnya, warna tulisan dan juga background pada saat kita klik tulisan lalu kita tahan dan tarik sehingga ada warna yang terlihat. Block biasanya digunakan untuk mengcopy tulisan yang ada diwebsite atau blog.

Block sederhananya berwarna biru langit di backgroundnya dan juga warna hitam ditulisannya. Disini kita akan mencoba merubah warna dari background dan warna tulisannya dengan warna yang kita inginkan. Contohnya seperti gambar dibawah ini.
Cara merubah warna block di blog
Seperti contoh gambar diatas. Background tulisan saat di block berwarna hitam dan juga warna tulisannya berwarna putih. Dan kamu bisa menggantinya dengan warna yang kamu inginkan. Cara membuatnya silakan ikuti langkah-langkah dibawah ini.
  1. Login ke blogger, dari halaman dasbor pilih pengaturan template.
  2. Lalu klik edit HTML dan cari kode ]]></b:skin> lalu masukan kode berikut ini diatasnya.
  3. ::selection {background:#000000;color:#FFFFFF;}
    ::-moz-selection {background:#000000;color:#FFFFFF;}
    ::-webkit-selection {background:#000000;color:#FFFFFF;}
  4. Terakhir, Save template dan selesai.
Keterangan kode:
  • background:#000000; untuk warna background
  • color:#FFFFFF; untuk warna tulisan
  • jika ingin mengganti background dan warna tulisan gantilah ketiga kode diatas dengan kode warna yang sama
Contoh penggantian warna block background dan warna tulisan 
::selection {background:#107cde;color:#0000000;}
::-moz-selection {background:#107cde;color:#000000;}
::-webkit-selection {background:#107cde;color:#000000;}
Silakan diganti sesuai dengan warna yang kamu inginkan, dan silakan baca juga artikel saya yang lainnya yang berkaitan dengan warna seperti cara membuat background warna transparan atau cara membuat background gradient 2 warna dan juga artikel-artikel lainnya. Semoga artikel diatas bisa bermanfaat untuk anda.

Friday 27 December 2013

Cara mengatur spasi tulisan di blog

Tips dan Trik kali ini adalah tentang cara mengatur spasi tulisan di blog. Spasi atau jarak kosong antara kalimat pada baris atas dan juga baris bawah. Dan juga jarak kosong antara huruf satu dengan yang lainnya. Tujuannya agar tulisan diblog terlihat lebih rapi, dan lebih mudah untuk dibaca.

Contoh spasi atau jarak kosong antar baris kalimat:
Contoh jarak spasi antar baris
Terlihat jauh jarak antara tulisan ini dengan tulisan atas.
Dan contoh spasi atau jarak kosong antar huruf.
Contoh jarak spasi antar huruf
Jarak antara huruf satu dengan huruf yang lain.

Dari contoh diatas sudah jelas kan, perbedaan antara spasi atau jarak kosong antar baris kalimat dan antar huruf. Berikut ini adalah contoh penerapan pengaturan spasi tulisan pada bagian posting blog. Ikuti langkah-langkah dibawah ini.
  1. Silakan login ke blogger, lalu pada halaman dasbor pilih pengaturan Template.
  2. Lalu klik edit HTML dan cari kode ]]></b:skin> dan masukan kode berikut ini diatasnya.
  3. .post-body {
    line-height:1.8em;
    letter-spacing: 0.1px;
    }
  4. Save template, selesai.
Keterangan kode diatas.
  • .post-body { untuk mengatur tulisan di halaman posting blog
  • line-height:1.8em; untuk mengatur spasi antar baris kalimat
  • letter-spacing: 0.1px; untuk mengatur spasi antar huruf
Silakan diatur sendiri sesuai dengan keinginan anda, untuk menambahkan atau mengurangi jarak antar baris ganti  nilai line-height:1.8em; contoh: 2.8em dan untuk spasti antar huruf ganti nilai letter-spacing: 0.1px; contoh: 1px;

Kalau seperti contoh diatas. itu kode spasi antar barisnya saya atur menjadi 2.8em dan spasti antar hurufnya 5px. Untuk pengaturan keseluruhan tulisan dari halaman posting artikel blog saya ini. saya atur spasi antar barisnya menjadi line-height:1.6em; dan untuk spasti antar hurufnya letter-spacing: 0.1px;. Menurut saya sudah cukup enak dilihat tulisan di blog saya ini dengan pengaturan nilai 1.6em untuk baris kalimat dan 0.1 untuk spasi huruf.

Silakan dibaca juga artikel2 saya yang lainnya, seperti membuat pangkat atas12 dan bawah90 di artikel tips dan trik menulis di blog. Dan juga artikel saya yang lainnya. Terima kasih telah berkunjung ke blog saya, dan semoga artikel diatas bisa bermanfaat untuk anda.

    Thursday 26 December 2013

    Cara membatasi jumlah artikel di Label

    Cara membatasi jumlah artikel di label atau kategori. Membatasi yang berarti akan ada batas jumlah artikel yang akan kita tampilkan. Seperti halnya halaman awal blog, kita dapat membatasi jumlah posting menjadi 4 atau 5 sesuai dengan yang kita inginkan. Dengan cara mengatur jumlahnya di pengaturan Tata Letak bagian Posting.


    Bagaimana dengan halaman Label. Normalnya jika kita membuka halaman label, maka semua artikel dengan label yang sama akan terbuka. Tapi dengan menambahkan beberapa kode di URL dari label atau kategori kita dapat mengatur tampilan jumlahnya.

    Dari link diatas, anda akan melihat artikel2 dengan label desain blog, jumlahnya ada 8, dan dibawahnya ada page navigation yang bertuliskan beranda dan posting lama. Jika posting lama diklik maka akan terbuka artikel2 lainnya yang berlabel desain blog.

    Diblog ini jumlah artikel dengan label desain blog sudah mencapai 50an lebih, kalau tampilannya tidak dibatasi, maka artikel yang akan tampil saat dibuka sekitar 20an, diatur oleh blogger sendiri. Dan pasti lama membukanya. Contohnya bisa di klik di link ini Desain blog tanpa pengaturan batas jumlah tampilan. Langsung saja, Cara membatasi jumlah artikel di Label silakan ikuti langkah-langkah dibawah ini.
    1. Login ke blogger, lalu buka halaman blog kamu.
    2. Lalu klik salah satu label yang kamu miliki. Lalu copi URL di address bar dan pastekan ke Notepad.
    3. Selanjutnya tambahkan kode ?max-results=8 dibelakangnya. Contoh:
    4. http://fandrajuani.blogspot.com/search/label/Desain%20Blog

      dan tambahkan kode ?max-results=8 jadinya seperti dibawah ini.

      http://fandrajuani.blogspot.com/search/label/Desain%20Blog?max-results=8
    5. Sekarang, cara memasangnya di blog. contohnya di menu laman. Silakan ke pengaturan Laman > Laman Baru > Alamat Web > lalu masukan Alamat web (URL) dan beri judul sesuai dengan nama label. Save, Selesai.
    Ganti Kode 8 dari kode ?max-results=8 dengan jumlah yang diinginkan, misalkan 5 atau 4. Silakan diatur sendiri sesuai dengan keinginan. Itulah sedikti tips trik tentang Cara membatasi jumlah artikel di Label. Semoga bisa bermanfaat untuk anda.

      Tuesday 24 December 2013

      Cara membuat link terbuka di tab baru

      Kali ini saya akan coba bagikan kode HTML yang berfungsi untuk membuat semua link yang ada di blog terbuka ditab baru pada saat diklik. Dengan begitu pengunjung blog akan lebih mudah untuk membuka link2 yang ada diblog kita, jadi tidak perlu lagi klik kanan open link in new tab.

      Link adalah alamat url dari suatu halaman website, contohnya seperti ini fandrajuani.blogspot.com. Langsung saja kebagian inti, cara membuat link terbuka ditab baru. Ikuti langkah-langkah dibawah ini.
      1. Login ke blogger, dari halaman dasbor pilih pengaturan template.
      2. Dan klik Edit HTML, lalu cari kode </head> gunakan Ctrl + F untuk memudahkan pencarian.
      3. Setelah ketemu, masukan kode berikut ini diatasnya.
      4. <base target='_blank'/>
      5. Terakhir, save template. Selesai.
      Mudahkan, dengan menambahkan kode <base target='_blank'/>, maka seluruh link yang ada di blog kita akan terbuka dihalaman atau tab baru ketika diklik. Selain untuk memudahkan pengunjung untuk membuka setiap link yang ada di blog, kode ini juga akan meningkatkan total tayangan laman dari blog kita. 

      Atau jika ingin membuat link terbuka ditab baru, tapi tidak disemua link di blog. Kamu bisa tambahkan kode target="_blank" atau target='_blank' di kode link HTML kamu. Contoh:
      <a href="http://fandrajuani.blogspot.com/p/blog-page_25.html" target="_blank" title="Profil">Profil</a>
      Hasilnya: Silakan klik link ini Profil

      Silakan dibaca juga artikel2 saya yang lainnya seputar seo seperti artikel tentang belajar seo untuk blogger pemula, tips dan mempercepat loading blog dan juga cara mempercepat loading blog lanjutan. Sedikit informasi seo kepanjangannya search engine optimization, fungsinya agar blog kita bisa masuk di halaman google search, jadi ketika ada yang mencari artikel yang berkaitan dengan judul artikel yang telah kita buat. 

      Maka blog kita akan muncul, walaupun tidak dihalaman pertama, bisa jadi dihalaman kedua dan seterusnya. Seiring waktu berjalan, jika artikel kita sudah sering dikunjungi. Maka nantinya akan masuk kehalaman pertama dari google search, sesuai dengan kata kunci yang dimasukan orang ke dalam mesin pencari google search. Terima kasih telah berkunjung dan semoga artikel diatas bisa bermanfaat untuk anda.

        Cara membuat google custom search diblog

        Cara membuat google custom search di blog, yang berfungsi untuk memudahkan pengunjung untuk mencari artikel yang ada diblog. Cara menggunakannya, masukan kata kunci tulisan ke dalam kotak search, lalu enter atau klik tombol search, maka artikel2 yang berhubungan dengan artikel yang dicari akan muncul. Contoh gambar kotak search google custom.

        Cara membuat google custom search diblog
        Seperti contoh gambar diatas, ada tulisan GoogleTM Pencarian Kustom didalam kotak penelusurannya. Untuk lebih jelasnya tentang cara membuat google custom search di blog. Ikuti langkah-langkah dibawah ini.
        1. Login ke blogger. Selanjutnya kunjungi situs ini https://www.google.com/cse/
        2. Lalu pada situs itu, Masukan alamat blog kamu. Dan atur languange nya ke bahasa indonesia(jika ingin seperti contoh gambar diatas) untuk bahasa inggris tulisannya kira-kira akan menjadi seperti ini GoogleTM Custom Search. Silakan diatur sesuai dengan yang diinginkan. Lalu klik Create.
        3. Cara membuat google custom search diblog
        4. Setelah itu klik get code dan copi kode scriptnya.
        5. Selanjutnya, kembali ke blogger. Pilih pengaturan Tata Letak > klik Tambahkan Gadget > HTML/Javascript dan pastekan kode script dari google tadi.
        6. Save dan tempatkan gadget sesuai dengan yang kalian inginkan. Selesai.
        Untuk merubah tampilan kotak google custom search, kunjungi lagi situs  https://www.google.com/cse/ lalu  klik search engine yang telah dibuat tadi, dan pada pilih Look and Feel. Nah disitu ada pengaturan Layout, Themes, Customize, dan Thumbnail silakan atur sesuai dengan yang dinginkan. Setelah selesai memodifikasi tampilannya, klik Save & Get Code dan pastekan lagi ke Gadget HTML/Javascript di pengaturan Tata Letak tadi. 

        Jika ingin hasil pencarian dari kotak seacrh google custom terbuka dihalaman tab baru. Pada pengaturan layout di situs google custom tadi, pilih Google Hosted dan pilih New Window. Jangan lupa disave dan ambil/copi kode scriptnya, dan pastekan kembali ke gadget HTML di blogger. Selesai. Semoga Bermanfaat.

          Sunday 22 December 2013

          Once Upon A Time

          With just 3 days before Christmas (how in the world did that happen?), I am sure there are many of you still on the lookout for last minute gifts.  If you have a child on your list who loves creative play and listening to stories, this gift I am about to write about was made for them.

          Yesterday, Quinn received one of the most adorable gifts from her bestie Liv and it has immediately become one of her favorites.  Storytime Toys has designed three toy house and story sets for your preschooler (young school age children will love these as well).  Quinn got the Three Little Pigs story but I ran out this morning and purchased the Hansel and Gretel set as well for her to open on Christmas morning.   She insisted on putting together the 
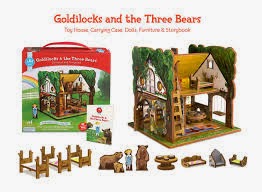
Three Little Pigs set as soon as we got home and played with it for hours.  The image below shows all three of the sets: Three Little PigsHansel and Gretel  and Goldilocks and The Three Bears.


          There are a ton of things to love about these sets, both for kids and their grownups.  For the kids, they are colorful and easy to manipulate.  Once they get the hang of putting the pieces together, they should be able to put them together on their own, or with just a little help from their big people.  They can follow the story provided in the book or they can make up their own stories.  For adults, each of the Storytime Toys sets is made of super durable materials that will take the abuse that your child(ren) are sure to give it.  They come with a sturdy box that you can store all the pieces in after your little storytellers are finished playing.  This is a bonus for all families who have more toys than they know what to do with, but an even bigger bonus to people like me who live in tiny apartments with WAY too much stuff.  Quinn was asking for a giant dollhouse from Santa this year, but we just don't have the square footage in our place for such a thing yet.  This is a great compromise for our household (especially since Quinn is a giant fan of fairytales).

          In addition to all of the pieces for the houses, including people and accessories, each set comes with a book with the story included.  This is a great way to work on improving focus and attentional skills and play skills in children who may struggle with that.  This is a toy that I think every single one of my speech therapy friends should have for their offices.  One of my favorite things about each book is that they with a couple of DIY activities related to the set.  For example, in the Three Little Pigs set, there are instructions to make mud puddles and picture frames to hang on the walls of the pigs houses.  I am sure that there are a bunch of other ideas that you can come up with on your own to go along with each of the stories.

          In addition to what has been mentioned already, the following occupational therapy goals can be worked on when playing with the Storytime Toys toy house and story sets:
          Improve Fine Motor Skills-putting the pieces of each of the houses together helps to work on improving both increasing grasp strength and in-hand manipulation skills.  There are some small pieces that need to be together which is great for encouraging children to use a fine pincer grasp during play.  I will be sure to remind the kids to use a fine pincer grasp when pulling the pieces apart after they are all done playing.
          Improve Bilateral Coordination Skills-in order to put these sets together, you will need to use both hands at the same time.  You may need to remind your child to hold one piece stable while putting the other pieces into place.
          Improve Visual Motor/Perceptual Skills-each set comes disassembled.  Putting them together is a great way to work on improving visual motor and visual motor skills.  The kits don't come with step by step instructions, but by looking at the picture on the box, it is easy to figure out how to put them together.  For your younger kids, they may need more assistance with this but be sure to try and get them to problem solve and figure it out on their own before doing it for them.  This could also be a great way to work on building a child's frustration tolerance when presented with more challenging activities.
          Improve Language Skills-like I have already mentioned, this toy set is perfect for all my speech therapist friends.  It is a great way to work on expanding a child's language and vocabulary skills.  The Three Little Pigs set is also great for working on breath control because you can have the kids work on blowing the houses down while following the story.  I am sure I am missing at least a million other speech and language goals that can be worked on with these sets.  Maybe if any of you out there reading this are speech therapists and want to comment on what goals you work on while using these sets, please message me and I will add any and all suggestions.
          Improve Social Skills-this is a great way for children to play together.  Not only can they put the sets together as a team, they can then act out the story after it is all put together.  I am excited to try this with one of my preschool social skills groups.  I love the idea of having them work together to put the whole thing together, but then to act out the story as a group.  I am already trying to brainstorm the fine motor or arts and craft project that can be done at the end so they can take it home and be able to tell their parents what they worked on during group.

          I am already trying to think about all the kids I can get these sets for.  I am thinking how nice these would be for some of my friends who have an older child and a preschooler....they older sibling could be the one to read the story and help the child put the houses together.  A great activity to encourage play skills at home especially for those parents who worry about their kids relying on electronics and television too much.

          So if any of you are still trying to figure out what to get that special little one in your life, I think this would be a perfect gift.  I have seen them in two stores so far, Little Things in Park Slope, Brooklyn and Tinker Toys in Woodstock, NY.  If you go to this link here, you will find a list of all the stores that sell them.  I know how convenient it is to buy things from Amazon, but remember what a difference each of your purchases make to all these independent toy stores.

          If you have any of these sets and want to share some craft activities to go along with them, please share them with us.  I love hearing from each of you and have gotten such great suggestions that I am able to use both at work and at home.  I am always a click away and check my email all the time!


          Saturday 21 December 2013

          Cara menuliskan rumus di microsoft word

          Kali ini saya akan coba bagikan artikel tentang Cara menuliskan rumus di microsoft office word, seperti rumus matematika dan lain-lainnya. Caranya cukup sederhana, kita hanya perlu memilih format rumus yang telah disediakan oleh microsoft word dan mengeditnya sesuai dengan yang kita inginkan. Untuk lebih jelasnya silakan ikuti langkah-langkah dibawah ini.
          1. Silakan buka program microsoft word, lalu klik Insert pada Tab atas disebelah HOME.
          2. Lalu klik Equation letaknya berada dipojok kanan atas. Contoh gambar:
          3. Cara menuliskan rumus di microsoft word
          4. Dan pilih salah satu format rumus lalu edit sesusi dengan yang kamu inginkan. Selesai.
          Untuk mengedit rumus, klik rumus lalu ganti dengan kode yang diinginkan, untuk menambahkan kode baru, klik rumus yang sudah dibuat. Lalu klik tab Design yang ada dipojok atas menu bar. dan cari kode rumus baru yang ingin dimasukan. Untuk memindahkan posisinya, blok rumus yang sudah dibuat > Cut > dan pastekan ketempat yang diinginkan. Seperti contoh gambar dibawah ini, rumus diletakan ditengah-tengah tulisan.

          Cara menuliskan rumus di microsoft word

          Jika ingin menempatkan rumus tidak ditengah2 tulisan kalimat seperti gambar diatas atau diletakan dibaris baru, klik rumus yang sudah dibuat, lalu klik HOME pada bagian atas kiri menu word dan klik paragraph pada bagian align, lalu pilih posisi yang diinginkan, selesai. Semoga Bermanfaat.

            Cara menghilangkan widget dihomepage

            Cara menghilangkan widget dihomepage atau halaman awal blog. Widget akan dihilangkan atau disembunyikan pada halaman homepage blog saja, widget tersebut hanya akan muncul di halaman posting blog. 

            Dengan begitu kita dapat menghemat ruang dari halaman homepage blog. Untuk lebih jelasnya tentang cara menghilangkan widget tertentu dihalaman awal blog, silakan ikuti langkah-langkah dibawah ini.
            Pertama yang harus dilakukan adalah menentukan widget mana yang akan kita sembunyikan dan Mengambil kode ID nya.
            Contoh: Widget dengan judul Random Post. Maka kita cari kode ID dari widget yang berjudul Random post. Caranya: Login ke blogger, pilih pengaturan template > klik edit HTML > Lalu cari kode Random Post(Gunakan Ctrl F untuk memudahkan pencarian). Seperti contoh gambar dibawah kode id dari widget Random Posts adalah HTML4
            Cara menghilangkan widget dihomepage
            Setelah menemukan kode ID dari widget yang akan disembunyikan. Sekarang cari kode </head> lalu masukan kode berikut ini diatas </head>
            <style type='text/css'>
            <b:if cond='data:blog.pageType != &quot;item&quot;'>
            <b:if cond='data:blog.pageType != &quot;static_page&quot;'>
            #HTML4{display:none;}
             </b:if> </b:if> </style>
            Terakhir Save template, selesai.
            Kode #HTML4 adalah kode ID dari widget yang akan disembunyikan dan kode display:none berfungsi untuk menyembunyikan widgetnya. Widget tersebut akan hilang dari halaman awal blog, dan akan muncul pada halaman posting blog.

            Silakan mencoba dengan widget2 yang lainnya. Yang terpenting adalah kita harus mencari terlebih dahulu kode id dari widget yang akan disembunyikan dari halaman awal blog, lalu meletakannya diatas </head> dengan format kode seperti diatas. Selesai.

            Wednesday 11 December 2013

            Cara membuat tabel diblog

            Cara membuat tabel diblog. Akan kita mulai dari Tabel sederhana terlebih dahulu.
            Silakan buka entri baru, lalu klik pada bagian HTML disebelah Compose.
            Selanjutnya ketikan kode berikut ini.
            <table>
            <tr>
            <td>1</td>
            <td>2</td>
            <td>3</td>
            </tr>
            </table>
            Setelah itu klik bagian Compose, Maka hasilnya akan menjadi seperti ini.
            123
            Selanjutnya membuat tabel 2 baris
            <table>
            <tr>
            <td>1</td>
            <td>2</td>
            <td>3</td>
            </tr>

            <tr>
            <td>4</td>
            <td>5</td>
            <td>6</td>
            </tr>
            </table>
            Hasilnya
            123
            456
            Dari contoh diatas, kita dapat melihat bahwa kode tr digunakan untuk membuat tabel ke bawah, sedangkan kode td digunakan untuk tabel kesamping. Jadi jika ingin menambahkan jumlah tabel, silakan tambahkan kode tr dan kode td sesuai dengan keinginan.
            Selanjutnya membuat Tabel dengan warna background, lebar tabel serta warna tulisan dengan cara menambahkan kode bgcolor="red" border="1" style="color: white; width: 400px;" pada bagian <table>. Contoh:
            <table bgcolor="red" border="1" style="color:white;width:400px;">
            <tr>
            <td>1</td>
            <td>2</td>
            <td>3</td>
            </tr>
            <tr>
            <td>4</td>
            <td>5</td>
            <td>6</td>
            </tr>
            </table>
            Hasilnya
            123
            456
            Sekarang kita coba menggunakan tabel dengan judul diatasnya, dan juga mengatur lebar disetiap judul tabel. Tambahkan kode <th>Judul</th> Contoh:
            <table bgcolor="red" border="1" style="color: white;">
            <tbody>
            <tr>
            <th width="40">No</th>
            <th width="400">Nama</th>
            <th width="400">Kelas</th>
            </tr>
            <tr>
            <td>1</td>
            <td>Fandra Juani</td>
            <td>3</td>
            </tr>
            <tr>
            <td>2</td>
            <td>Juani Fandra</td>
            <td>6</td>
            </tr>
            </table>
            Hasilnya
            NoNamaKelas
            1Fandra Juani3
            2Juani Fandra6
            Bisa juga dengan menggunakan background yang berbeda. Contoh:
            <table bgcolor="white" border="1" style="color: black;">
            <tr>
            <th bgcolor="blue" width="40">No</th>
            <th bgcolor="green" width="400">Nama</th>
            <th bgcolor="red" width="400">Kelas</th>
            </tr>
            <tr>
            <td>1</td>
            <td>Fandra Juani</td>
            <td>3</td>
            </tr>
            <tr>
            <td>2</td>
            <td>Juani Fandra</td>
            <td>6</td>
            </tr>
            </table>
            Hasilnya
            NoNamaKelas
            1Fandra Juani3
            2Juani Fandra6

            Untuk mengatur posisi tulisan kamu bisa gunakan Tool Alignment yang ada dipilihan tool pada saat kita menulis di entri. Sebenarnya masih banyak kode dengan fungsi lain yang dapat digunakan untuk membuat tabel diblog, insyaallah nanti akan saya coba buat diartikel lainnya. Silakan dicoba sendiri dan Semoga bisa bermanfaat untuk anda.

            Tuesday 10 December 2013

            Kids Can Be Comics Too!

            Many of my blog posts are directed towards the preschoolers that I see.  I can't seem to stop myself when I see great toys for preschoolers because I have a preschooler of my own at home and can get double usage out of the toys that I purchase.  This doesn't mean that I am not constantly on the lookout for great toys and activities for my school age children.  Last week, I picked up the most amazing activity after I saw a Facebook post by Norman & Jules, my favorite toy store in Park Slope.  I was sold by just seeing the picture for the mu Magnetic Comic Strip Kit that they posted.  I couldn't get there fast enough and when I did, I was delighted to see that there were two kits.  I quickly purchased both the Original and the Aquamarine series and rushed off to see my 9 year old who was going to love them.

            There are so many things to love about this toy.  I love anything that requires a child to use their imagination; more importantly, I love a toy that requires imagination AND no electronics.  I feel like so many kids depend on electronics these days and while I do use them during my sessions with kids, I like to do as much hands on work as possible.  Many of the older kids that are on my caseload are seeing me to work on handwriting and organizational skills so it is much more important that work on the iPad is kept to a minimum.  These magnetic comic strip kits are a perfect way to work on handwriting, organizational skills and other executive functioning goals.  They can be used on a fridge or any other magnetic surface but can also be used on the floor or a table.  

            Each kit comes with over 20 different magnets.  There are also blank magnets and speech bubble magnets included in each kit so the comic creator can add their own pictures and write their story out.  Depending on the age and skill level of the child you are working with, you can come up with specific requirements for their comic strip.  For example, you might tell a child that they need to use 8 magnets that are provided and then use a certain number of blank magnets and speech bubbles.  For those school age children who have difficulty with organizing his/her work and thoughts, giving them those specific instructions might help them be more successful with this activity.  I have already tried it with some of my kids and have noticed that when I let them do what they want without any direction from me, they have more difficulty focusing and keeping their story flowing.  Like many of us, simple directions and guidelines will often guide us to be more successful in almost all of our work.

            Here are a few more occupational therapy goals that can be worked on using the mu Magnetic Comic Strip kits:
            Improve Grasping Skills-this is a great activity to work on handwriting and for those kids who have a poor grasp but love comics, can be easily tricked into working on holding that marker the correct way if they are doing something fun.  While each set comes with their own dry erase marker, I also would have these smaller sized dry erase markers on hand; remember that sometimes the shorter a writing instrument is, the more likely you will see an expected grasp.
            Improve Organizational Skills-so many of the school age kids I work with are struggling with organizing their work.  They have fantastic, I mean REALLY fantastic ideas, but get so distracted that they don't get their point across the way they intended to.  Sometimes they are so anxious to just get it finished and share it that they forget to focus on the important details that keep a story flowing.  Try and have the children you are working with pick out a certain number of magnets before even beginning and then have them talk through their idea before they even begin writing and drawing.  With time, you can take away some of the prep work but to begin with, it is important to help guide our kids and give them good organizational skills that they can not only use with this activity but with their homework and schoolwork.
            Improve Graphomotor Skills-this is a great activity to work on both handwriting and drawing skills. In addition to having a variety of awesome magnets, you have 4 blank magnets and 2 speech bubbles to fill in on your own.  When I have used these, I have asked that the child be sure to write a certain amount of sentences and draw a certain number of pictures.  They must make sure that whatever they draw relates to the magnets that they have chosen.  For many of my older kids, they are so worried about being perfect and right that they avoid most drawing and handwriting activities.  I find that when they are given specific instructions in addition to being able to be creative, they can be more successful.
            Improve Upper Extremity Strength-I often have children with decreased upper extremity/hand strength work on a raised surface to work on strengthening those muscles.  It tends to get harder to ask a 8 or 9 year old to work on an easel because they think it is childish.  Have the children you are working with put these on the fridge while standing up....make them put their magnets up as high as they can without it being a strain.  They will be so busy creating that they won't even realize that they are working on building up those arm muscles!
            Improve Social Skills-this is a great activity for a dyad or small group of kids to do together.  They can come up with a story as a team and each be designated one speech bubble and two blank magnetic squares.  The most important thing is that they work together to come up with a story and do all they can to stick to the story at hand so that when they are putting it all together at the end that it makes sense.  This may require compromise and flexibility...something that so many of the kids we work with struggle with.  

            As I mentioned earlier, I purchased my sets at Norman & Jules in Park Slope.  If you can't get to the store in person, then be sure to check them out online.  I promise you that you will find more than you intended if you spend enough time in their store or on their website!  In addition to having an amazing selection of toys, books and craft sets, they donate a portion of all their yearly sales to The March of Dimes in honor of their daughter and her friends who were all born prematurely.

            I would love to hear from you and am only a click away.  I love the idea of using comics for my older kids who need to work on handwriting, drawing and executive functioning skills.  Do any of you have any other great create your own comic kits to share with me and my readers?    I love hearing from all of you and really appreciate all your comments and suggestions.  They not only help me but also benefit all the kids I work with!


            Tuesday 3 December 2013

            Cara merubah tampilan dan posisi tanggal di blog

            Artikel kali ini saya akan coba bagikan cara merubah tampilan tanggal diblog dengan menambahkan kode css, serta merubah posisi tanggal ke bagian bawah judul posting atau bisa juga kita pindahkan ke sebelah kanan judul posting.

            Cara merubah tampilan dan posisi tanggal blog

            Seperti contoh gambar diatas, tampilan tanggal sudah saya modifikasi jadi berwarna putih dengan background warna biru, serta posisinya yang berada disebelah kanan judul posting blog. Cara membuatnya, ikuti langkah2 dibawah ini.
            1. Login ke blogger, ke pengaturan tata letak > desainer template > tingkat lanjut > tambahkan Css. Lalu masukan kode ini kedalamnya.
            2. h2.date-header{
              margin:3px 0px 0px 0px;
              float: right;
              z-index: 99;
              background-image: -moz-linear-gradient(center top , #107cde 40%, #004d94 100%);
              box-shadow:0px 10px 10px #aaaaaa;}
            3. Terapkan ke blog, selesai.
            Keterangan kode:
            • margin: untuk mengatur spasi atas(3px) kanan(0px) bawah(0px) kiri(0px) tanggal.
            • float: right; menempatkan tanggal diposisi kanan sebelah judul posting.
            • z-index: 99; gunanya agar tanggal terlihat.
            • background-image: fungsinya untuk mengatur warna background tanggal
            • box-shadow: warna bayangan diluar kotak tanggal.

            Selanjutnya adalah menempatkan tanggal dibawah judul posting dengan posisi sebelah kanan, contohnya seperti gambar dibawah ini.


            Cara merubah tampilan dan posisi tanggal blog

            Cara membuatnya, ikuti langkah-langkah dibawah ini:
            1. Login ke blogger, kepengaturan template. Klik edit HTML dan cari kode dibawah ini.
            2. <b:if cond='data:post.dateHeader'>
              <h2 class='date-header'><span><data:post.dateHeader/></span></h2>
              </b:if>
            3. Kamu akan menemukan 3 kode yang sama dengan kode diatas, Cut atau potong kode yang pertama. Lalu pastekan di Notepad.
            4. Selanjutnya cari kode <div class='post-header-line-1'/>. Setelah ketemu, pastekan kode dari langkah 1 tadi ke bawah <div class='post-header-line-1'/>.
            5. Save template Selesai.
            Catatan: ada 2 kode <div class='post-header-line-1'/> yang ada ditemplate, pilih yang kedua. Lalu pastekan kode dari langkah 1 kebawahnya. Jangan lupa juga untuk mengatur kode css dari tampilan tanggalnya, seperti yang tertera di Keterangan kode. Khusus untuk kode float:right; jika kamu ingin menempatkan tanggal disebelah kiri dibawah judul posting. ganti kode float:right; dengan kode float:left;.

            Semoga Bermanfaat.