I honestly can't believe it's that time of year already. It seems like it was just yesterday when I put together
last year's gift guide. I'm not sure how long I have been doing this, but I can date myself by saying that I know it is only in the last couple of years that I have added an iPad app section.
Year after year, families I work with ask for suggestions on not only what they can get for their kids for the holidays, but also what they can tell their friends and families to get. As we all know, there is an overwhelming number of toys out there. The commercials for light up pillows, animal slippers whose mouths open when you take steps, mood sand and magic markers are enough to drive us all mad and into the poor house!
My goal for my gift giving guide is to provide you with items that are not only fun, but will have a therapeutic value for those of you whose child needs that. For the most part, the things I recommend are items which can be used by all children, not only those that need support. They are (for the most part), items that can be purchased in local toy stores or online. Anyone who follows this blog knows that I love to support the local toy stores!
I hope you find this list helpful. If you click on the name of each product, you will be directed to the website or a place where you can purchase that item.
Please use the list below to reference the abbreviations under each product. These codes will tell you what skills can be addressed using the toy, game, app, etc.
FM- improves fine motor skills
GR- improves fine motor grasping skills and in-hand manipulation skills
VM- improves visual motor skills
VP- improves visual perceptual skills/visual scanning skills
EH- improves eye-hand coordination skills
SP- improves sensory processing skills, such as attention and focus
SA- improves safety awareness
MP- improves motor planning skills
ST- improves strength
BC- improves bilateral coordination/using two hands at the same time
EF- improves executive functioning skills
SS- improves social skills
GM- improves gross motor skills (jumping or whole body movements)
SC/Ind- improves self-care and activities of daily living skills; improves independence
Happy Holidays to you all! I hope that they are filled with lots of love and laughter and, for the little people in your life, lots of fun and playing!
Drawing Books
Don't Let the Pigeon Finish This Activity Book-I am a huge fan of all things Mo Willems so when I saw this book in the
Community Bookstore in Park Slope, I had to get it. It's a great book with a variety of really fun activities for kids. Opportunities to practice writing letters, drawing and coloring with your favorite characters from the Mo Willem books. One of the things I really like about this book is that there are some activities that can take more than one session.
GR VM EH FM
Lazoo-there are nine different books to choose from and I can't say one is better than the other. I adore all of these and each one is so unique and different from other coloring and activity books. My first book was the Holes book and my kids couldn't get enough. I quickly picked up the Squiggles and Stickers/Incredible Stickers books. Perfect for preschoolers who may not always love coloring and drawing books because the pictures are motivating and exciting for them to complete. Many of the kids I work with get stressed with coloring books because the pictures are too big and their hands get tired. With drawing, they avoid this task because they aren't quite sure where to start the picture. These books are great because they give you something concrete to begin with and then you can allow your imagination to run wild. These books allow for success and the more successful they are, the more likely they will be to try coloring and drawing activities outside of their comfort zone. Here is a link to the
Lazoo Store....warning, you may not be able to stop yourself!
GR VM EH FM
Zolocolor coloring books- I'm not going to lie. I love when my kids at work want to use these books. The pictures are so fun to color and I find it therapeutic to just zone out and color with the kids. My kids love these books because the shapes are fun to color in and you can do whatever you want. For many of my kids, this ends up being a bit of a long-term project. Great for older kids who love to color but have outgrown many of the character coloring books out there.
GR VM EH FM
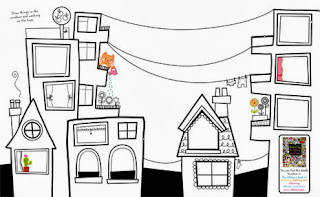
The Usborne Coloring Books- Another fantastic collection of coloring and drawing books for older kids. These books are filled with beautiful pictures and designs to color in and/or complete the pictures. For those kids who struggle with starting a drawing project, these books are great because they don't need to worry about that. There are a bunch of different versions of this book so you will easily find one for your child (boy or girl) will enjoy. Take a look at the picture on the left and you will see an example of just one of the images you can find in these books. This one here allows you the jumping off point for so many things: draw people in the windows of the houses/buildings or draw clothing hanging off the clothesline. There is no right or wrong here. It's about having fun and doing your best and at the end, they will have a picture they can be proud of! I have seen these books at Barnes and Noble and many independent book stores.
GR VM EH FM EF SP SS
Arts and Crafts
Rainbow Loom- I blogged about this a few months ago and think it was by far my most popular post ever. No surprise since the Rainbow Loom only gets more popular each and every day! I can't say enough about this product. I love that it has become so popular amongst school age kids and that you are seeing them excited about making bracelets and not glued to an iPhone, iPad or portable gaming device. For kids with fine motor and motor planning difficulties, this may be difficult, but the amount of pride they feel when they master it is amazing. For my older kids who need to work on executive functioning skills, I have them find a video on YouTube so they can follow the step-by-step instructions. I have spent many hours on YouTube myself learning different bracelet patterns. Many local toy stores sell the real loom (I am a bit of a Rainbow Loom snob and after trying a few of the knock-off brands, I won't use any but the real one) but if you have a
Michael's nearby you will be sure to find a loom and dozens and dozens of different colored bands.
FM GR BC EH VM SP Orb Factory Mosaics
- I have been using these in my private practice for years now. It's hard to contain my love for them, evident by my previous blog posts
here and
here. What I love about this company is that they could have easily stopped creating and still be super popular but they didn't do that. Their products continue to grow and keep me coming back for more. They have sets made for toddlers (matching different colored shapes) and for older kids (matching different colored squares and gems to assigned numbers). They are all brilliant and at the end, the kids have an amazing piece of art that they get to take home and show to their loved ones. This helps foster self-esteem and confidence which is the most important factor in a toy or craft.
FM GR BC EH VM SPCrayons- We all love the traditional set of Crayola crayons and I am not saying that you shouldn't have those in your house. In fact, no home would be complete without its own set! As an occupational therapist, I would tell you to take those perfect crayons and break them in half to promote a proper grasp. If you can't do that (and I totally understand...I cringe every time I do it myself), here are some crayons that will help in promoting a proper grasp for those of you who have children with strength or grasping issues:
Star Crayons- The shape of these crayons is perfect for encouraging a tripod grasp. The star shape also makes all coloring and handwriting activities a little more fun for the little ones I work with!
 Left Right Ergonomic Crayons:
 Perfect for those kids who are too young to have a hand dominance or kids who keep switching. The shape is made so that no matter what hand you choose, you will be forced into a tripod-like grasp.
Crayon Rocks- Designed to strengthen the tripod grip muscles, which are essential for creating a proper grasp, and is so important for graphomotor and handwriting skill development. Soy wax crayon,s that offer bright and vibrant colors, are small crayons whose size helps to encourage a tripod grasp. Because they are small, there is no way that a child can't fist them, which is a common grasp I see with my younger kids.
FM GR
Djeco Collages for Little Hands- Super cute set of animal collages perfect for your preschooler/early school age child. Each set comes with four different collages that you can make. Following the visual directions, you use a variety of materials to make a cute animal. Great for working on early organizational skills in our little ones. At the end, they have a set of four ridiculously adorable collages that they take great pride in.
FM GR BC EH VM SP
Yellow Owl's Little Prints-as with many things these days, I discovered this book at Norman & Jules in Park Slope. This book teaches readers a wide variety of crafting skills such as stenciling, printing and stamping in order to create different keepsakes, decorations and gifts that will make the special people in your life feel loved. Great for the tweens/teens in your life who have outgrown many of the arts & crafts kits out there and want to be more hands-on with their crafts.
GR VM EH FM EF SP SS
Hiho Batik-I blogged about this awesome Park Slope store months ago and you can read about my amazing experience here. I can't say enough about this place and the people who run it. There is a passion and devotion here that comes out in all the work they do. Not only can you buy some of the coolest homemade clothes out there (Quinn's been sporting Hiho Batik clothing since the day they opened), you can make your own in their studio located at the back of the store. I have gone for a 1:1 session and a birthday party and couldn't have been more impressed with the attention that goes into every detail. Both times I went, the children needed a little extra love and attention; I mentioned it to Julia, store owner, before coming and she did everything in her power to make sure the time we spent there was a successful one. Your child walks out of this experience with not only a really cool piece of clothing, but a sense of pride and confidence that is infectious. Check out this link that shows a video of the make your own batik experience at Hiho Batik. For those of you in the NYC area, gift certificates are available for purchase if you need a little something for the stocking. This could be a great way to spend a cold and snowy winter day.
GR VM EH FM EF SP SS
Toys/Manipulatives
Tegu Blocks- I absolutely love these blocks. Tegu Blocks are simple, wooden blocks that have a magnet inside. So a child can not only build their sets up, but also out to the sides. There are a variety of sets, including ones that allow you to build a moving car. My daughter has been playing with these blocks for years and never tires of them. They are more expensive than your typical wooden block sets, but they are not your typical blocks. Because of how well made and durable they are, this is a toy that you will be able to pass down to your kid's kids in the years to come.
FM GR BC EH SP
Lego Duplo Read and Build- Legos seem to be another one of those toys that never get old. When I discovered the Lego Duplo Read and Build Sets, I was so excited. These sets are perfect for those smaller hands that have difficulty with the small size Legos. The accompanying instructions are great because they give very clear visuals on how to build the different objects (jungle and farm animals, bugs/caterpillar, and a car set) in the book. This requires a child to organize their work, plan what they are doing and follow visual directions.
FM BC EH MP ST
Ogobild Bits- I discovered this Brooklyn-based company last holiday season when I saw them at one of the many amazing holiday markets all over the city. If you have kids who love building, but you have enough Lego sets, this is a great gift for them! There are small and large sets and each comes with a bunch of suggested items to build. Great for working on building a child's imagination skills while building the muscles of the hands! I have used them in my social skills group both with preschoolers and school age kids and they had an absolute blast.
FM BC EH MP STMagnaTiles- I bought these years ago and my kids still love them. These magnetic plastic shapes help foster creativity and imagination. I have used this both in my 1:1 work and in my social skills groups. Another toy that comes with a bit of a price tag, but will last forever.
FM BC EH MP ST SS
LaQ- I discovered this awesome manipulative building set this summer after a trip to
The Bronx Zoo. For the Lego lovers, this is another great toy. These are actually flat shapes that snap together to make a ton of different shapes. For tons of different patterns to make cars, animals, people, etc. using these different shaped blocks, clink
here. My kids love them and I don't see them getting too frustrated when it gets difficult to follow the directions. Better suited for the older kids I work with (often too difficult for the preschoolers, especially those with fine motor difficulties).
FM BC EH MP ST
Giraffe Safari Nest & Play Blocks- I've been a fan of
Skip*Hop products since the beginning when they were just diaper bags. A few years ago they began making really nice wooden toys. This cute toy is ideal for your little ones (around 1 1/2 years old). They can be stacked on top of each other, match the towering animals and then you can drop the ball into the holes. For those of you who live in smaller spaces, they can nest inside of each other and take up little room.
BC EH MP
Giraffe Safari Stacking Animal Blocks- These adorable blocks are a perfect gift for those little people in your life. Included is a set of five jungle animals that can be stacked on top of each other, lined up next to each other or used in conjunction with other block sets. A great toy to work on improving play skills and teaching your child about different kinds of animals.
BC EH MPGames
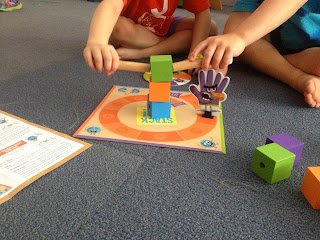 Stack Up
- A great cooperative game perfect for preschoolers or young school age children. The purpose of the game is to work as a team to build a stack of blocks using sticks (the blocks have a hole on either side and children must work together to put their stick in the hole and place it on top of the other blocks). There are challenges as well that keep the kids on their feet and moving around. I love watching the kids figure out how to work together to make the tower. Cooperative games are great for teaching kids the importance of team work and that sometimes winning is not the most important part of a game!
BC SP GM
Spot It- I was late to the Spot It world but haven't turned back since I discovered it. It's a great card game that works on matching, visual scanning and visual perceptual skills in a fast-paced fun way. It's a perfect game for as few as two, and as many as six, kids. It comes in a small and compact container that makes it easy to throw in a bag for car rides, train rides, etc. Kids don't seem to ever tire of this game and there are multiple ways to play to keep it fresh and exciting. I have both Spot It and Spot It, Jr. and use both all the time.
SS VP SP
Tumbling Monkeys- This is by far one of my most favorite games- ever! It's fun for both my preschoolers and my school age kids. It's similar to the game Kerplunk, but you have a tree filled with monkeys instead of a tower filled with marbles. I let the children playing decide the rules of the game- mainly, is the winner the one with the least or the most monkeys?
SS EH VM SP FM GR
Tenzi- I love this fast paced dice game. Each container has 40 dice (10 of four different colors) and the rules are quite simple. Roll all 10 dice at once and the first person to get all 10 dice to have the same number is the winner. My older kids love this and come up with their own rules to play which is really heartening to see. With my younger kids, I like to use five dice instead of 10. They often get the rules, but their hands are smaller and it is much more difficult to hold onto so many dice at a time. Check out their website for different and exciting ways to play this game.
FM GR BC EH VM SP SS
Perfection- An oldie but a goodie. I use this game almost every day with my kids and they never get sick of it. Perfection is great for learning shapes and improving matching skills. For my older kids, I may use the timer but only if they want it. Sometimes I hide the shapes in theraputty in order to work on increasing grasp strength at the same time. The original version of the game is not so easy to find, but you can find it
here. There is a
newer version with different shapes, but instead of having to match 25 shapes, you only have to match nine which is good for much younger kids.
FM GR EH VM SP SS
Obstacles- I have fallen in love with the toy company
Eeboo. They have an amazing selection of games, crafts, etc. I have used Obstacles both in my social groups and in my 1:1 sessions. There are a bunch of cards that have barriers/hazards and a bunch of cards that have tools that can be used to overcome those barriers in order to get yourself home. When used individually, I may have my kids who need to work on handwriting write out their thoughts and ideas. When used in a group setting, you can pair kids up to work as a team to come up with the best way to overcome the obstacle with the tool they have. I love games that can be adapted to meet the needs of a particular child and his/her goals and this is definitely one of them. This game will provide hours and hours of entertainment to your child and encourage creativity and problem solving at the same time.
SP SS EFGross Motor Toys
Kickboard Scooter- Once children have outgrown their strollers, I suggest parents get their kids a good scooter to get around on. I live in NYC, but there are a lot of other families out there whose children are within walking distance of scool who would benefit from using a scooter. The Mini-Micro scooter is perfect for your preschooler while your school-age child will love the Maxi-Micro scooter.
GM SP SA MP ST BC
OgoDisk- Another great product created by Brooklyn-based, OgoSport. The OgoDisk is a perfect gross motor activity for your kids. Super light and easy to bring to the park, playground or beach, this toy comes with two disks and a ball. The disks are made from a hard foam outside which allows for a comfortable grip and a nylon-spandex center. My kids have such a fun time with this activity and I love that it can be a social activity at the same time.
GM SP MP ST BC
Yogarilla Cards- I love using these yoga cards with all my kids. The large cards provide a great visual for the kids to imitate and on the back of each card, there are alternate positions for those who may have difficulty with the poses. I am not a yogi by any means, but I love using yoga to help organize, ground and get my kids to focus. I totally appreciate the instructions written on the back of each card that can be used when giving the instructions. I have a lot of kids who typically hate yoga, but they love these cards and actually ask to use them.
GM SP MP ST BC EFClothing/Dress-up
 EZ Sox
- I have loved
these socks since first reading about them years ago and have been recommending them to families ever since. I even used them with my typically developing daughter who wanted to independently put her socks on. They have expanded their products to not only offer a wider range of sock styles (in both kids and grownup sizes) but also have
underwear now. I know that many of my kids who have fine motor difficulties have difficulty with dressing and undressing and I love that this company has created something that looks really cute and promotes independence for self-care skills. With increased independence comes increased self-esteem and confidence.
SC/Ind MP BC EF
Soft Clothing- As a therapist I'm very well aware of how sensitive some of the kids I work with are to clothing...the tags, the buttons, the seams, etc. Am I right, fellow therapists? Which is where
Soft Clothing comes into play. They offer a wide range of cute clothing made especially for these kids. In addition to having seamless socks and underwear, they have really cute clothes that have wider necks (to avoid rubbing up against the skin and causing irritation) and are made from soft and comfortable fabrics. We all know how much better we function when we are comfortable in our clothes, so the same goes for kids. How can we expect them to have a good day if they aren't wearing clothes that make them feel good? As a bonus, many of the pants have elastic waistbands so kids who have strength issues but want to be independent for dressing and undressing, can benefit from these clothes as well. I have recommended this company to parents of kids with down syndrome who had decreased grasp and upper extremity causing dressing and undressing to be hard for them.
SC/Ind MP BC EF
Magical Apparel Vests and Dress-up- For those of you who have kids with (some) sensory difficulties or fine motor delays, here is a set of dress-up clothes that will support them. Large buttons and fasteners make it easier for them to be independent when putting these clothes on. They are made to hold some weights to provide deep input to your child who may need that in order to remain calm in social situations.
Fun and Function, a fantastic therapeutic catalog, has many different costumes for your to choose from.
SC/Ind MP BC EF SSStocking Stuffers
Aaron's Thinking Putty- Who doesn't love putty? I know that I still play with it, especially since my sister Kara discovered this awesome company. This putty is great for working on increasing grasp strength and manipulation skills in a fun way. There are all different kids of putty to choose from- magnetic, glow in the dark, see through and, my personal favorite, the changing color ones!
GR FM SPDiscovery Putty- I have been using theraputty with my kids for as long as I can remember. I will take small objects and hid them in there to make it more fun. How happy was I when I heard about
Discovery Putty by
Fun and Function? There is a soft-resistance putty with 15 different food treats hidden inside and a firm-resistance putty with 15 different safari animals inside. This is a fantastic way to work on building fine motor skills in a fun way. My kids LOVE this putty and ask for it over and over again.
GR VM EH FM SP SSZoo Sticks- I use these chopsticks all the time with my kids. This is a fun way to encourage kids to eat while working on increasing grasp strength at the same time. They are not only good for eating, but it's a fun way to pick up small toys and sort them into different containers. Kids
love them and don't even realize that they are working when they play with them. The best part? There are over 30 different ones to choose from!
GR VM EH FM EF SP SSMarbleous Necklaces- I have to give a little shout out to two of my favorite 9-year olds who came up with the idea for these beautiful necklaces and their moms for supporting their creativity and turning it into a reality. If you're looking for a special gift made with love, please check out their Facebook page. These necklaces can be custom made for special events. I have actually had to give the necklace off my body to someone who loved it so much! As if this couldn't get any sweeter, I'm happy to share that 10% of the annual proceeds will go to
Autism Speaks because the people behind this awesomeness believe in giving and spreading love, tolerance, joy and hope.
For all you locals, you can head to
Norman and Jules in Park Slope to browse through their special selection of Marblous Necklaces!
iPad Apps
I love using the iPad during my therapy sessions. I don't use it alone, but find it to be a truly motivating tool, especially for things like handwriting, learning letters and drawing pictures. I don't want to say that using the iPad is the end all and be all of therapy, but my kids work harder and generalize skills. When used in conjunction with more hands-on experiences, like paper and pencils, I find that progress is seen faster.
Lately, I have found more apps that focus on improving fine motor skills such as pinching, grasping, etc. Here are just a few of my- I mean the kids'- favorites!
*I highly recommend using a stylus as often as possible when using the iPad in order to work on developing a proper grasp on a writing instrument. Check out this
crayon stylus by iCreate or this
number 2 pencil stylus by Amin Swessi Designs. Each link will bring you to my blog posts which describe each one in depth along with all the OT goals that can be addressed by using these apps.
 Pepi Tree
- I find myself playing this app every once in a while without any kids around. The animals are so cute and I love that you can work on improving fine motor, visual motor and sensory-processing skills while also working on building language skills.
Bugs and Buttons/
Bugs and Buttons 2-
Little Bit Studio offers some of the finest apps out there. The best part is that each of their apps contains 18 fun and motivating games that work on a variety of educational games. My kids don't tire of these apps and since there are so many games available, you can go weeks without repeating a game!
Bugs and Bubbles- Another amazing app by
Little Bit Studio Honestly, I can't get enough of this app and how many occupational therapy goals can be addressed when using it.
Face iMake ABC- This app provides users with a great way to learn the ABCs and work on improving visual motor, visual perceptual and matching skills.
iMagineMachine outdid themselves with this app. Be sure to check out their link
here because there are plenty of other amazing apps to choose from that will not only entertain but educate your children.
Don't Let the Pigeon Run This App- Not only great for working on OT skills, but my speech therapy friends love using this entertaining app to work on language skills with the kids on their caseload. Totally worth the more expensive price tag than I normally pay for a single app.
Lazoo Apps- There are five apps by this brilliant company. Many of them are free and the ones that cost anything are well worth the small price tag!
Pinch Peeps- A great, free app. It's perfect for older children who need to work on finger strength and grasping skills. The more peeps you pinch, the more challenges you face so it keeps a child on their toes and maintaining their attention.
Dexteria Jr.- A great app that works on improving fine motor skills in pre-school age children (although many of the older children I work with love it as well). This app is so much fun that the kids don't even realize they are working!
Doodlecast-
Sago Mini- Offers an amazingly creative and fun line of apps for toddlers and preschoolers. I am a tremendous fan of
Doodlecast, but my 3 1/2 year old daughter just loves all of their apps that we have on our iPad.
 Toca Boca
- I really love their line of apps. In fact, it's hard to have any self-control when looking through their amazing selection of apps. Highly motivating and educational apps that will provide entertainment for all family members. My favorites (and it is really difficult to choose) are Paint My Wings, Toca House and Toca Cars.
These are just a few but there are so many apps out there. Please
email me if you want more specific suggestions for any particular skill. The apps listed above are a
very small sampling of what I have reviewed and what I have on my iPad.
NYC Area Toy Stores
I say this on each and every blog post, but it is more important to me this time of the year:
shop small business when possible. Support those local toy and book stores near you. These people work so hard and provide so much to your neighborhoods. Here are a few of the local small businesses that I support throughout the year in NYC:
 Norman and Jules
- Park Slope, Brooklyn. This is a beautiful toy store located in the heart of Park Slope with the most amazing selection of wooden toys and games. One of my favorite things about this store is that there is almost nothing in the store that requires batteries. Courtney and Avi do a tremendous amount of research to get the best of the best in there and are always willing to help a customer find the perfect gift.
Little Things- Park Slope, Brooklyn. Two locations- one dedicated to Lego, Arts and Crafts and Seasonal items while other has dolls, games, baby toys, etc. A true go-to store for all your holiday shopping!
Acorn- This small toy store has a beautiful selection of wooden toys, doll houses and dolls. If you are looking for a special toy for a special person in your life, this is a perfect place to check out.
Stationery Toy World-I have worked on the UWS for 10 years now and have been shopping in this store for just as long. The owner, Donna, is incredibly helpful and dedicated to keeping the most popular items in stock. If you need suggestions on what to buy for a particular child, she will help you out. You may pay more here than on Amazon, but the customer service is unbeatable.
Kidding Around- A great toy store with locations in both Chelsea and Grand Central Station. There is a wonderful selection of games, puzzles, arts and crafts supplies and all other play essentials. I have always found the staff to be friendly and helpful when looking for gifts.
Greenlight Bookstore- Fort Greene, Brooklyn. An awesome selection of kid's books. I never leave this store without something wonderful!
A Time for Children- Located on the UWS of Manhattan. A Time for Children is owned and operated by a NYC-based philanthropy and donates 100% of its profits to
The Children's Aid Society. Here you will find a special selection of toys, clothes and gifts.
Toy Stores Outside of NYC Suggested by Others
Magic Beans- Four locations in the Boston area. Independently owned and operated by parents. They have a wide selection of baby, toddler, kid and educational toys.
The Village Bookstore- Littleton, NH. I grew up in Northern New Hampshire so I may be a little (or a lot!) biased, but this is so much more than a bookstore. Some of my happiest childhood memories are from when my sisters and I were cut loose downstairs in the children's/toy/play section. Here you will find an amazing selection of toys, puzzles and arts and craft supplies.
Animal Instinct- Ogunquit, Maine. I hit this toy store up every summer on vacation. There is a great selection of toys, games, puzzles and books. I am a bit of a sucker for their Maine/Moose section when you first walk into the store!
Mom and Pop Place- Neenah, Wisconsin. This is a natural parenting store and baby store featuring wooden toys, cloth diapers and other baby essentials.
Go Bananas- There are two locations in Loudon County, Virginia. About 30 miles west of Washington DC. It's an award-winning family-owned and operated specialty toy and gift store for children.
Fun Stuff Toys- Seaford, New York. Specializing in kids' toys, here you can shop for creative, educational, developmental games, puzzles and specialty toys.
Whirlygigs- Exeter, NH. A classic shop from the past packed with toys of every kind. From the latest craze to the classic toys you grew up with, they can help you find what you are looking for.
Matty's Toy Stop- Nassau County, Long Island, New York. With multiple locations, this store offers a great selection of kids toys, educational items, learning and fun toys for all ages.
The Acorn Store-Santa Monica, California. There is a beautiful selection of wooden and imaginative toys for children from birth to school age.
Wonderland- Brentwood, California. A magical placed filled with quality treasures and gifts that will satisfy the fun inside of you all! They scour the planet for unique, specialty toys that will be fun and educational for all kids.
JennyBec's-Brentwood, California. From books, toys, games, furniture, wall art and fine linens, you will find all you want from newborn through tween. They pride themselves on being able to provide practically any gift, toy or furnishing!
Growing Tree Toys- State College, PA. They offer a quality selection of educational toys to aid child creativity and intellectual growth.
Oliver's Trains & Toys- Evanston, Illinois. A small, family operated toy store in the suburbs of Chicago. This store offers a wonderful selection of trains and educational toys.
Becky & Me Toys- Evanston, Illinois. Becky was a teacher with 15 years of early childhood experience. Here they try out the toys, play the games and read the books before they put them out on the shelves of their store. They are constantly looking for new companies and products that have value to all the children who walk in their door.
Creative Kidstuff-Twin Cities, MN. This store specialized in creative, innovative and educational toys. They have a staff full of knowledgeable and kind-hearted people who truly love kids.
A2Z Science & Learning Store-located in downtown Northampton, MA, this toy store is filled with educational toys, skill toys, construction toys, flying toys, books, games, minerals and fossils.
The Toy Box-Amherst, MA. This store has a dynamic environment where kids and adults are encouraged to play! They pride themselves on their high level of service and hand picked products.
***I would love to add to this list, so if you have any other suggestions of great toy stores in your neck of the woods, please let me know. I am a click away and would love nothing more than to generate a list of small, independent and specialty toy stores that we can all support***I hope that you find this list helpful and that there is something special for the little (or not so little) people in your lives. If you have anything you would like me to add to the list, please let me know. I am always looking for new toys and products to motivate the kids I work with to learn and gain new skills.
Email me and I will add to this list. I know there are a million other great things out there and I look forward to hearing from you about them.
I tried to add as many new things as possible to this year's list. However, there are so many other great toys and activities out there for you to know about. Please check out my previous years' lists if you need or want additional ideas:
2012 Holiday Gift Guide2011 Holiday Gift GuideMost of all, I hope that you have a very happy and healthy holiday season. May joy fill your hearts and homes. May the New Year bring health and happiness to you and those you love. Thank you for joining me this year and helping me help you! I look forward to the upcoming New Year and discovering and sharing all kinds of new toys, crafts, activities and apps with you.
Thank you and happy, happy holidays,
Meghan


